Introducing AI.VirtuallyAware.com for IT Professionals

We are thrilled to announce the upcoming release of ai.virtuallyaware.com. We will explore the AI phenomenon from both an evaluative and technical perspective, while highlighting its common use cases that will empower IT professionals like never before.

Evaluating

We are all new to AI as it emerges and matures. On this site we share what we discover. All the good or bad and how it might fit into your different business units.

Common Use Cases for IT Professionals

The possibilities for leveraging AI in the realm of IT are immense. We will explore some key use cases where the impact of AI is expected to be particularly transformative:

1. Data Analysis and Insights

AI can revolutionize data analysis by providing advanced insights and predictions. IT professionals can harness AI to process large volumes of data at an unprecedented speed, identify patterns, and generate valuable insights that can drive informed decision-making.

2. Cybersecurity

In the era of increasing cybersecurity threats, AI can be a potent weapon in an IT professional’s arsenal. AI-powered systems can analyze vast amounts of data to detect anomalies, identify potential security breaches, and proactively respond to threats in real-time.

3. IT Efficiency

Managing and optimizing diverse IT environments can be challenging. From day to day tasks, to script building, to building automated processes in conjunction with other IT tools, the efficiencies that can be achieved are career changing.

4. And More….

Psychology of the AI Revolution

Just as virtualization and cloud technologies revolutionizing IT, the advent of AI marks a paradigm shift in the way IT professionals work. This will also require a new way of thinking and decision making far beyond the IT professional. Just as virtualization and cloud technologies had psychological barriers long after they were technically sound, AI will face the same skepticism and fear. Hopefully here we can alleviate some of that as we share our experiences through the evaluative prowess, technical brilliance, and a plethora of use cases AI promises. Stay tuned for updates on its release, as we prepare to embrace this transformative technology.

We would love to hear your thoughts and expectations on the upcoming AI revolution. Share your insights in the comments below and let us embark on this journey together!

Posted in AI | Leave a comment

Active Directory Scripting Highlight: Test Basic Network Connectivity with PowerShell

Throughout my work with domain migrations, there are inevitably some very basic steps before getting deep into User attributes, Groups, Computers, and the myriad of ways that client applications use Active Directory that need to be transitioned to a new directory.  Before any of that happens, there is that moment when the networks can first communicate with each other, or at least the respective network teams say they networks can see each other and all the appropriate ports are open.  This is the opening of the door to the greater transition, but if everything isn’t quite right, you could find yourself battling issues down the road.  Using this simple script from the source to the target DCs and vice versa will allow you confidence that the network team has configured the connectivity correctly for Domain or Forest Trust connectivity as well as application port openings.

Test-NetConnection –ComputerName “DC1” -Port 389

image

Other ports to test for successful AD Trust Connectivity

image

Once you have the ports confirmed to be open, you can then get to the heavy lifting of object and attribute migrations to bring your AD migration forward.

More tips from along the migration path are ahead.

Posted in Active Directory, ADMT, PowerShell | Tagged , , , , , , | Leave a comment

Active Directory Scripting Highlight: Identify and Move Active Directory Operations Master Roles with PowerShell

Getting your bearings and knowing everything you can about a Forest/Domain you are migrating is key.  Which domain controllers in the Forest and Domains hold the Operation Masters roles is one of those important details as you modify or decommission domain controllers.   In Today’s article I am showing you how to identify your Operations Master Roles and then how to migrate them to other domain controllers using PowerShell.

Honestly, this is my go to procedure to migrated the Operation Masters roles.  Using these PowerShell commands is much easier to move Operations Master Roles than hunting and pecking through the different Active Directory management consoles. Here is how to do it.

Identify Operations Master Roles:

Multi-Level Domain to get Operations Master Roles location

Get-ADDomain | Select-Object InfrastructureMaster, RIDMaster, PDCEmulator


Get-ADForest | Select-Object DomainNamingMaster, SchemaMaster

image

Single Level Forest to get Operations Master Role locations.


Get-ADDomainController -Filter * | Select-Object Name, Domain, Forest, OperationMasterRoles |Where-Object {$_.OperationMasterRoles} |Format-Table –AutoSize

image

Move Roles:

Now that we know where the Operations Master Roles reside, we can now move them to other domain controllers with another simple command.

Note:  Permission are key.  You will either need Enterprise or Domain Administrator permissions to perform these moves.

Move-ADDirectoryServerOperationMasterRole -Identity “Target-DC” -OperationMasterRole 0,1,2,3,4

image

What do the Numbers mean?  Here is the Key:

PDCEmulator = 0

RIDMaster = 1

InfrastructureMaster = 2

SchemaMaster = 3

DomainNamingMaster = 4

From one PowerShell window you can identify and move any Operations Master role in  your Forest or individual domain.  No more opening multiple Active Directory management consoles.  Whether you are moving the roles before a Domain Controller rebuild or migrating the roles off for other reorganizational reason, this makes it easy.

Posted in Active Directory, PowerShell | Tagged , , , , , , , , | Leave a comment

Active Directory Script Highlight: Simple HTML Export of all Group Policy Object Details

So once you have cleaned up your group policies like I outlined in my last two Active Directory Scripts Highlights,  what’s next? In this article I have a couple of variations of  scripts using the Get-GPOReport cmdlet that will allow you to export all of your Group Policy settings into HTML pages, just like you would see from the Settings tab from within Group Policy Manager.

The first script exports all of your Group Policies into one big HTML page.

Get-GPOReport -All -ReportType Html -Path c:\temp\Domain_GPO_AllGPOsReport.htm

image

This will allow you to both have a record of all of your group policy settings, and it is also a quick way to produce a single searchable page for certain Group Policy settings within all of your Group Policies.

The second script exports your Group Policies into individual HTML files.  These are searchable from a folder level based on name or text inside each of the HTML files.

Get-GPO -all | % {Get-GPOReport -GUID $_.id -ReportType HTML -Path “C:\Temp\GPOOut\$($_.displayName).html”}

image

Note: Remember to Create your output path with the following command  first or your PowerShell script will error out. 

New-Item -ItemType Directory -Force -Path C:\Temp\GPOOut

Both of these scripts provide a way of capture your group policy setting from a point in time to document your environment or give you a professional output when providing documentation to those organization you are performing migrations for.

Do you have any GPO Documentation scripts?  Paste them in the Comments below.

Posted in Active Directory, Group Policy, PowerShell | Tagged , , , , , , , , | Leave a comment

Active Directory Script Highlight: Group Policy Object Cleanup and Efficiency

Going a step further from the previous post with a little more detail, the script below adds of GPOStatus, and version increment number for Computer and Users section for each Group Policy.

Get-GPO -All | Sort GPOStatus | Format-Table Displayname, GPOStatus, CreationTime, ModificationTime,@{Label=”ComputerVersion”;Expression={$_.computer.dsversion}},@{Label=”UserVersion”;Expression={$_.user.dsversion}}

image


With the addition of GPOStatus, Computer Version, and User Version, a few more cleanup options are possible, both to remove orphaned policies and to make Group Policy processing faster during logon or computer restart.

Two things to look for with the addition of GPOStatus and Computer and User Version numbers.  If you see a Group Policy with a zero in both the User version and the Computer version, you know that no settings are set for that policy and the policy can be deleted.

image


Additionally, if you see a Group Policy that has a zero in either of the User version or the Computer version and the GPOStatus is  set to AllSettingEnabled, you could speed up the Group Policy processing by disabling the User or Computer portions of the policy.

image


Any PowerShell tricks to keep your Group Policy Objects cleaned up.  Drop you tips in the Comments below.

Posted in Active Directory, Group Policy, PowerShell | Tagged , , , , , , , , , | 3 Comments

Active Directory Script Highlight: Pre-Migration Group Policy Inventory and Cleanup

gpo

Todays Active Directory cleanup topic looks at Group Policy Objects.  In most of the environments I have prepared for migrations, old Group Policy objects are another problem area that should be cleaned up before an Active Directory migration. In many cases, as organizations are brought into the fold of another company, some of the OU structure is maintained until full integration can happen at a later date. In this case, maintaining the active Group Policies to preserve user and computer object settings, limiting the number of changes during this transition, is important.  Finding the group policies that are active is the trick.  The example below will give you a good base understanding of the migrating organization or your current Group Policy structure to enable you to clean up potentially stale Group Policies objects.

Sometimes the simplest scripts and get you a long way.  Today’s Group Policy identification script is a basic inventory of what you have for Group Policies with their creation time and last modified time.


Get-GPO -All | sort displayname |ft displayname, creationtime, modificationtime –a

image

Looking for Group Polices that were created a long time ago and not modified in a while could signal the first pass a what could be targeted for removal.  Working together with the administrators of the organization being migrated on this list of Group Policy Objects will likely reveal more that could be removed allowing you to focus on only active Group Policies slated for migration or cutting some of the fat and making your Active Directory a little leaner.

Posted in Active Directory, Group Policy, PowerShell | Tagged , , , , , , , | 1 Comment

Active Directory Script Highlight: Identify Old Computer Objects Before AD Migrations

old-computerIn the last of my Active Directory cleanup post, I have given you some options to identify, disable, and move User objects based on a certain time of inactivity.  In this post I am going to give you some simple scripts to do the same thing for your Computer objects.  The hope it that by following these posts you will be left with the real target of objects to be migrated, or to give your Active Directory a good spring cleaning that often gets neglected in the day to day management of your environments.

The first script will give some basic information back on Computer Objects that have not set their computer password in the last 180 days that are not already disabled.  Output gives SamAccountName, LastPasswordSet, Name, DistinguishedName, and confirmation that the Computer Object is enabled.   Sorts the output by LastLogonDate attribute and Exports the output to a CSV location.  This is a broad sweep to get an idea of what is out there so you can make determinations about location and age of Computer Objects.

Search-ADAccount –ComputersOnly -AccountInactive -TimeSpan 180.00:00:00 | ?{$_.enabled -eq $True} | sort LastLogonDate| Format-Table samaccountname, LastLogonDate, name, distinguishedname, enabled | Out-File -width 256 c:\temp\Outfile.txt

Modifying the output to include more or less attributes is as simple as adding them to the select-object string.

Start the Cleaning:

So after you have reviewed the output, what do you do with the data?  This is where cleaning house starts to come in.  After you have determined that the accounts are the target that you want, you can then take action to disable them.  I recommend disabling them instead of deleting them because it is inevitable that someone will come back after a long sabbatical and have trouble logging on because their Computer Object has been deleted. The script below identifies the same group of Computer Objects over 180 days since their computer renewed its password as we did before, sets it as a variable and disables all of those identified Computer Objects and then moves them to a designated DisabledComputers OU.

Search-ADAccount –ComputersOnly-AccountInactive -TimeSpan 180.00:00:00 | ?{$_.enabled -eq $True}

Disable-ADAccount $DComputers

Get-ADComputer -Properties * -Filter * | ? Enabled -eq $False | Move-ADObject “OU=DisabledComptuers,DC=YourDomain,DC=Local”

Targeted Determination:

One more modification to the above script as searching your entire domain as the script above to identify all Computer Objects over 180 days old most certainly will be too broad. The script below targets an OU.  In most environments you will probably have your Computer Objects in one OU and your Server Objects in another OU.   They are all Computer Objects in Active Directory so the script below will allow you to target just the right OU to make sure your disabling doesn’t reach the wrong population of Computer Objects.   By Specifying “-SearchBase” you can target only Computer Objects location you desire.

$DComputers = Search-ADAccount –SearchBase “OU=YourComputersOU,DC=YourDomain,DC=Local”  -ComputersOnly -AccountInactive -TimeSpan 180.00:00:00 | ?{$_.enabled -eq $True}

Disable-ADAccount $DComputers

Get-ADComptuers –SearchBase “OU=YourComputersOU,DC=YourDomain,DC=Local” -Properties * -Filter * | ? Enabled -eq $False | Move-ADObject “OU=DisabledComputers,DC=YourDomain,DC=Local”


Have your own Active Directory cleanup scripts. Computers? Users? Groups?.  Help out and add them in the comments section.

Posted in Active Directory, PowerShell | Tagged , , , , , , , , , | Leave a comment

Spectre/Meltdown Update: Haswell and Broadwell Processors Now Have The Production Go Ahead From Intel

hpeBoth Dell and HP have released System ROMs to protected against the Spectre variant 2 vulnerabity for their Haswell and Broadwell line of servers which encompasses most of the PowerEdge 13G line and the HP Gen9 server lines.  Last week the PowerEdge 14G line and HP Gen10 line System ROMs were released.  Whereas this was good progress, the bulk of enterprise server environments rely on the Haswell and Broadwell line of Intel processors at this time. With this release, it will now allow for most of these environments to be protected.


dell_2016_logoDell PowerEdge 12G and HP Gen8 System ROMs are still being developed with hopes to be released in the coming days/weeks, but there is little hope for  pervious generation servers will have a full fix at the System ROM level.  Stability will be the key as the first round of System ROM releases were a bit shaking causing crashes both at the Host and VM levels.  I will be installing the new ROM and will report my findings.  If you see any issues, let me know.

To see if your server now has an updated System ROM, check the links below:

HP: https://h22208.www2.hpe.com/eginfolib/securityalerts/SCAM/Side_Channel_Analysis_Method.html

Dell: http://www.dell.com/support/article/us/en/19/sln308588/microprocessor-side-channel-vulnerabilities-cve-2017-5715-cve-2017-5753-cve-2017-5754-impact-on-dell-emc-products-dell-enterprise-servers-storage-and-networking-?lang=en

Posted in Hyper-V, Spectre | Tagged , , , , , , , , , , , , | Leave a comment

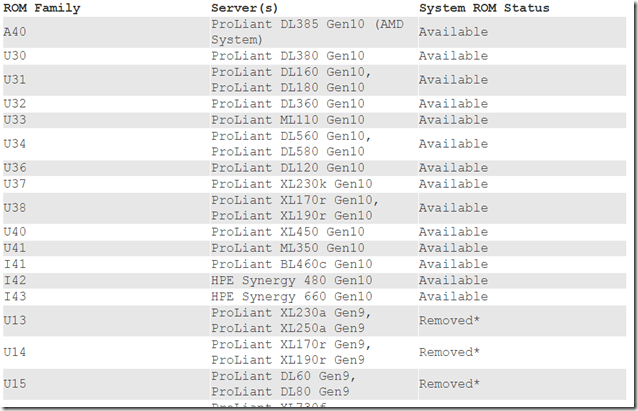
HP Gen10/Skylake-SP Servers now have a new System ROM available for Spectre Vulnerability.

HP has released key System ROMs for their Proliant Gen10 servers to mitigate Variant 2 vulnerabilities for Spectre.  See the release notes HERE

Explanation of different Variants of the Spectre/Meltdown Vulnerabilities from HP’s article (Release Microcode pertains to Variant 2):

There are three variants to the issue. Variant 1 (CVE-2017-5753) and Variant 2 (CVE-2017-5715) are also referred to as Spectre. Variant 1 requires only an OS update.

Variant 2 requires both an OS update and a new microcode which is included in an updated System ROM.

Variant 3 (CVE-2017-5754) is also referred to as Meltdown and only requires an OS update. All three variants of the attack require malicious software running on the system. To reduce exposure to these vulnerabilities, HPE recommends customers vigilantly maintain security best practices and keep systems up to date.

Update (02/20/2018) -Intel has now granted production status to an updated microcode for Skylake-SP processors used on HPE ProLiant and Synergy Gen10 servers. System ROMs are now available from HPE that include this updated microcode.


2018-02-22 15_15_54-Bulletin_ HPE ProLiant Servers - Side Channel Analysis Method Allows Information

Here’s to hoping for better results this time around.  If you have any results to report, please leave your comments below or at @VirtuallyAware.

Posted in Meltdown, Spectre, Vendor | Tagged , , , , , , | 1 Comment

Active Directory Script Highlight: Disable and Move Users Who Have Not Logged on In 180 Days

PowerShell-Active-Directory-1In my last post I showed a simple script to identify users that have not logged on in the last 180 days and export basic information to a CSV file.  This allowed you to look through the list and determine if the users were valid and really did include the users that you wanted to target for disabling.  Once you are comfortable with the users you are targeting, it’s time to disable them.  The following script will again set the population that is over 180 days since last logon, then disable them, then move them to a designated disabled users OU.

$Dusers = Search-ADAccount -UsersOnly -AccountInactive -TimeSpan 180.00:00:00 | ?{$_.enabled -eq $True}

Disable-ADAccount $Dusers

Get-ADUser -Properties * -Filter * | ? Enabled -eq $False | Move-ADObject “OU=DisabledUsers,DC=YourDomain,DC=Local”

* Looks at Users older than 180 days within the whole domain,  that are not already disabled, disables them, and moves them the DisabledUsers OU for YourDomain.Local.

If you are looking to target a particular OU of users you can simply add the –SearchBase following by the distinguished name of the OU you want to search in like the following.

$Dusers = Search-ADAccount –SearchBase “OU=YourUsers,DC=YourDomain,DC=Local”  -UsersOnly -AccountInactive -TimeSpan 180.00:00:00 | ?{$_.enabled -eq $True}

Disable-ADAccount $Dusers

Get-ADUser -Properties * -Filter * | ? Enabled -eq $False | Move-ADObject “OU=DisabledUsers,DC=YourDomain,DC=Local”

* Looks at Users older than 180 days in a particular Organization Unit that are not already disabled, disables them, and moves them the DisabledUsers OU for YourDomain.Local.

Posted in Active Directory, PowerShell | Tagged , , , , , , | 1 Comment